 NEWS
NEWS
NEWS
NEWS
NEWS
Google Maps has finally added the ability to get multi-stop directions, but for now, the functionality is only available for Android users. Previously users could find restaurants and gas stations along their route but were unable to navigate to those stops on Google Maps and then carry on with their navigation to their final destination. The latest update to Google Maps now makes it easier to navigate to these multiple stops.
The update to Google Maps also includes new functionality for the Your Timeline tool, with the ability to add your memories to specific days of your vacation.
Here’s a look at the new changes coming to Google Maps for Android.

Make sure you have the latest version of the Google Maps app installed on your device.
To get multi-stop directions to a variety of destinations, open the app > enter your destination > tap Add stop in the corner menu.
To rearrange the order of your multiple stops, tap and hold the three dot menu icon and drag it to the new position.
Tip: To add multiple destinations, you can also search as normal for restaurants, coffee shops, and gas stations.
Once you have added all your destinations to your route and are happy with the order, tap Done. Enter navigation mode and you will be directed to your multiple stops.
The new multi-stop directions for Google Maps is currently only rolling out to Android users, but will be coming to iOS soon.
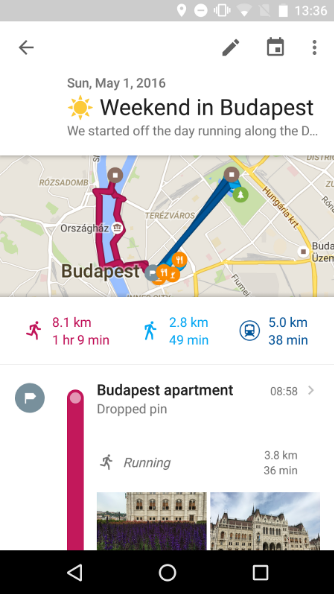
Google Maps introduced the Your Timeline tool, which shows you exactly where you have been on any given day, month or year. Now the Your Timeline tool has a new feature that will allow you to add specific memories (for example, a favorite restaurant, a memorable moment, etc.) from your trip to Your Timeline.
To access Your Timeline, open Google Maps > click the Menu icon > select Your Timeline (ensure you are signed into Google Maps). Select a date from the vacation and add specific notes to ensure you don’t forget those special moments at a certain destination.
Note: You need to have Location History turned on to access Your Timeline. To check this, sign into Google Maps > My Accounts > Personal info & privacy > Places you go. If the slider is blue, Location History is turned On.
The new functionality for Your Timeline is only available for Android and will be rolling out over the next few days.
… We’d like to tell you about our mission and how you can help us fulfill it. SiliconANGLE Media Inc.’s business model is based on the intrinsic value of the content, not advertising. Unlike many online publications, we don’t have a paywall or run banner advertising, because we want to keep our journalism open, without influence or the need to chase traffic.The journalism, reporting and commentary on SiliconANGLE — along with live, unscripted video from our Silicon Valley studio and globe-trotting video teams at theCUBE — take a lot of hard work, time and money. Keeping the quality high requires the support of sponsors who are aligned with our vision of ad-free journalism content.
If you like the reporting, video interviews and other ad-free content here, please take a moment to check out a sample of the video content supported by our sponsors, tweet your support, and keep coming back to SiliconANGLE.